Does all cat litter have silica gel?

Does all cat litter have silica gel?

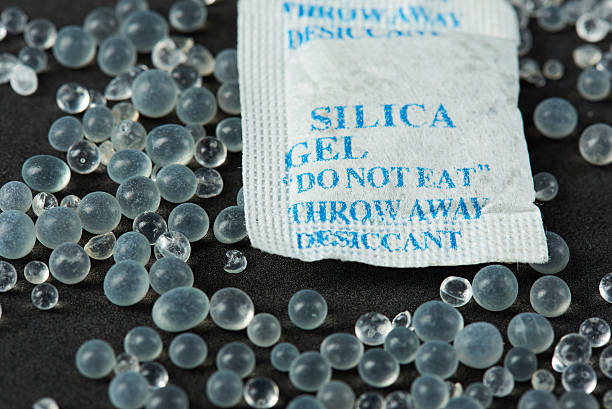
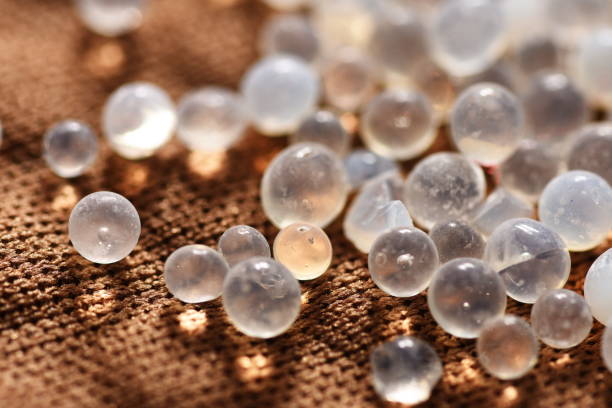
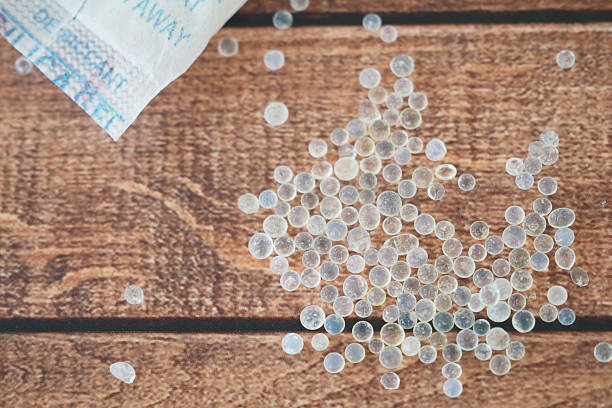
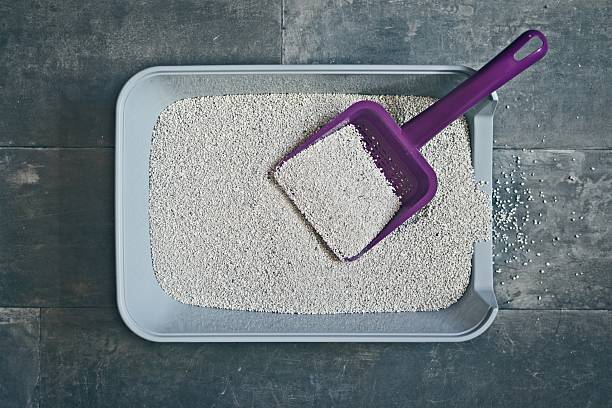
Anyone who’s shared their home with a cat can tell you that the litter box is more than just a convenience; it’s central to the health and comfort of both people and pets. You head to the store and see shelves loaded with so many options, each promising better odor control or less tracking. Folks wonder about what actually makes up these litters, especially with concerns about safety for pets and households. Not every litter puts silica gel front and center. Some blends rely on minerals like bentonite clay, some stick with natural sources such as wood, paper, or corn, and some choose silica gel for its absorbency and odor control. The conversation about litter ingredients isn’t only for the curious — it becomes part of the bigger picture when we start to think about dust, disposal, allergies, or what cats truly prefer.Clay-based litter dominates the traditional market. Often labeled “clumping,” bentonite clay locks up moisture into easy-to-remove clumps. Many households swear by it, saying it balances cost and performance. Nobody in my family talks about silica when scooping. We’ve all dealt with that unmistakable clay dust after fresh-pour day, and plenty of us worry about our cats breathing it in or tracking it across the floor. Some prefer alternatives made from recycled newspaper pellets, hardwood sawdust, or even corn. These variants stand out for being compostable or less dusty, but their performance can vary. So many of these products don’t contain silica gel at all. Just scanning packaging, you’ll find marketing that touts low dust or earth-friendly sourcing. The demand for safer formulas with clear, honest labeling isn’t coming only from cat lovers; it’s showing up in pet health recommendations and even vet offices. The litter aisle isn’t a field of identical products — far from it.Silica gel — sometimes known as crystal litter — pops up as a glossy, pearl-like granule that turns from clear to yellow with use. Its main draw lies in its ability to trap moisture, which keeps odors in check longer than many clay alternatives. Some cat owners appreciate the way silica gel cuts down on both dust and frequency of changing the box. Certain studies point to fewer respiratory irritants in silica-based products compared with clay options, but the research isn’t endless, and every pet responds differently. As a cat parent, you start to notice subtle trade-offs: crystal litters can crunch underfoot, and picky cats often reject the unfamiliar texture right away. Price plays its part too, since silica gel formulas can cost more over time. Still, they don’t show up in every bag at the store — only on those that call out “silica gel” on the front. For a long time, I stuck with clay, thinking it was best, until a cat with allergies pushed me to experiment. Each household weighs things out, depending on budgets, allergies, or even how often the vacuum comes out.Litter safety moves beyond what's in it, sliding into how we handle it, how much dust lingers in the air, and what’s left behind in the environment after every change. Silica gel breaks down differently than clay and certainly isn’t the same thing as sand or crushed shells. Some experts express caution about tiny particles if cats or kids get into them, and few on the environmental side see it as a green option. Plant-based litters — with no silica gel, no artificial chemicals — keep gaining ground for families hoping to avoid landfill impact or that telltale aroma of artificial perfumes. My own trials with pine pellets and paper-based litter felt messier, but I slept better knowing there was less risk if a curious kitten tried to taste the product. The best litter, in practice, is one your cat will use reliably, won't raise health red flags, and won’t choke out your air with dust.If there's a lesson from scanning pet forums and store aisles, it's that transparency makes a real difference. Labels need to spell out silica gel, clay, or plant fibers, so health-conscious shoppers feel empowered to choose. Veterinary advice and shelter practices ought to factor in the individual cat’s needs as much as convenience for humans. More research into long-term effects from both clay and silica products would give families confidence in their choices, instead of guessing about what lingering dust might mean. Waste management matters as well, and encouraging people toward compostable or reduced-impact options can help shrink that silent mountain of waste generated by millions of cats. Listening to both science and lived experience shines a light past the marketing and into what cats — not just their people — truly want and need. I remember seeing a nervous rescue cat, happy for the first time, scratching in soft, chemical-free litter. Safety, comfort, and clean air matter. That’s the kind of home I want both for pets and their families.

How to dry / preserve flowers (roses, lilies, orchids, hydrangeas, dahlias, sunflowers, bouquets) with silica gel?

How to dry / preserve flowers (roses, lilies, orchids, hydrangeas, dahlias, sunflowers, bouquets) with silica gel?

Anyone who’s ever received a bouquet knows how quickly those vibrant reds and yellows start to lose their spark. Roses, lilies, orchids, hydrangeas—each bloom carries its own story, whether it’s a wedding, a birthday, or a simple gesture of appreciation. Watching these petals droop and the color fade feels like watching the memory itself slip away. Years ago, I struggled to keep the beauty of gifted flowers alive. Vases, then pressing them between books, then even using hairspray. None of these managed to really hold onto both the color and texture. That was until silica gel came into the picture. This isn’t just a trick for hobbyists—preserving flowers with silica gel can help you hold onto a moment of joy long after the fragrance fades. Drying flowers with silica gel actually means borrowing from science we encounter in everyday products like shoe boxes and snack packs. Silica gel draws out moisture rapidly and evenly, making it possible to keep flowers looking surprisingly lifelike. It works for those delicate orchid petals as well as thick dahlias and the classic rosebuds that always steal the show. Dropping blossoms into a tub of crunchy silica granules doesn’t take much training or fancy gear. Yet, it does take an understanding of how moisture leaves the plant and why some blooms hold up better than others. Petals with dense surfaces—sunflowers, for example—need careful handling, because overpacking can press the face of the flower, leaving an imprint that’s almost as disappointing as crushing a souvenir in your suitcase. Orchids, with their thin, almost suede-like petals, can soak up too much silica dust if buried carelessly, shifting colors in awkward ways.Through a mix of trial and years of reading up on advice from botanical experts, it’s clear that prepping stems and blooms matters as much as the drying process itself. Snipping off extra greenery, making sure stems aren’t sitting in water before they hit the silica gel, and trimming to let more air inside the flower all help mold a better result. Time becomes crucial, too: roses, depending on thickness, might dry out in five to seven days, while something like large hydrangeas often takes upwards of two weeks. Jump the gun and flowers stay soft and damp, inviting mold. Wait too long, and colors start turning muddy, especially on the paler pinks and whites.In the rush to preserve, mistakes are common. I learned quickly that repeatedly opening the container to check on flowers lets moisture back in, slowing the process and sometimes ruining batches. Silica gel itself doesn’t last forever without maintenance—it needs to be dried out after absorbing so much water, usually by heating. Not all silica gels work the same way, either. Indicator beads that turn color show when the media’s ready for another round of blooms, reducing guesswork and waste. Ensuring added ventilation in the workspace helps, too, so you’re not breathing dust or introducing extra humidity. By paying attention to these details, you get results that don’t just look pretty on a shelf, but genuinely last.People preserve flowers for more than craft projects or interior design. Each preserved stem can serve as a piece of personal history—reminders of graduation, celebrations, or simple joys. This practice has roots in family rituals and folk art, going far beyond Pinterest trends. Science backs up the value in this: floral preservation keeps alive not just color and shape, but a person’s connection with memories that mean something. The method suits not only those who take up crafts in retirement or for wedding keepsakes, but anyone who wants their home to feel more like theirs. Teaching the next generation about these traditions also turns preservation into a skill passed down, not lost to convenience or disposability.Walking into a home dotted with dried bouquets on mantels or hung above windows tells guests that stories matter here. People worry that silica gel preservation takes the soul out of natural materials, but practice shows that intention and care are what make these keepsakes worth it. Instead of leaving flowers to wilt in a vase, taking a few extra steps turns a fleeting gesture into something that lingers, tangible and vivid. Better directions and greater transparency, from garden clubs and online communities, make this method accessible to more people, regardless of age or skill.For those new to the practice, it helps to start with forgiving flowers—the sturdy sunflowers with their thick centers, the hydrangeas with many petals, or the tightly packed roses. Silica gel pries open creative possibilities for bouquets that mark special moments. Beyond just seeing a pretty bouquet, handling the final results—delicate but tough, colorful yet preserved—instills respect for both the science and sentiment packed into each bloom. This isn’t about resisting time, but about honoring meaning in a way that endures.

Can you dry flowers with stems in silica gel? In microwave?

Can you dry flowers with stems in silica gel? In microwave?

Holding onto a fresh bouquet often feels a bit like trying to keep a summer day from slipping through our fingers. Maybe it’s roses from a wedding, or wildflowers plucked on a hike. The idea of keeping that beauty for months or years has always drawn gardeners, crafters, and folks who just love nature. Over the years, I’ve dried everything from garden zinnias to grocery store sunflowers, battling humidity, weather, and impatience. Each method brought a lesson in what actually preserves a flower’s look versus what leaves a brown, shriveled mess. Among the many tricks shared around kitchen tables and garden groups, drying flowers with stems in silica gel stands as a trusted path to real, vivid preservation. Tossing the microwave into the process adds some risk—and a lot of curiosity—about how far you can push fast results against lasting beauty.Flower drying goes back centuries—think old herbariums, sentimental keepsakes, even pressed flowers in family Bibles. Most methods, from hanging to pressing, dry petals slowly with air. Silica gel works like a sponge, pulling moisture out fast by surrounding each petal with tiny beads. The lure is pretty simple: silica gel can keep a flower’s color brighter, forms closer to their original shape, and texture less brittle than air or wire-hanging. For anyone who’s ever glanced at their “dried” hydrangea bouquet and found brown, crinkled petals instead of blue, this matters a lot. With the stem on, blossoms stand more naturally, which helps with display or arranging later. Basic household silica gel beads—the same stuff that shows up in shoe boxes—handle moisture fast without molding or attracting bugs, and best of all, they're reusable. This method lets you lay a flower, stem and all, in a jar or container, nestling it gently so every part finds support. Roses and peonies, tricky to dry upright with just air, keep their profiles and vividness, from stem to tip, if given the right support underneath and patience at the end.Shortcuts in drying always tempt, especially if there’s an event coming up, or an impatient gardener waiting to see how the project turns out. Microwaving with silica gel gives that promise of saving days or even weeks on the timeline. After getting advice from fellow gardeners and trialing plenty myself, the process goes something like this: put the flower with stem buried in silica gel inside a microwave-safe container (never put the lid on), and zap it in short bursts, pausing to check. Too long, and the blooms burn. Too short, and they're limp or never set properly. Most folks who get it right suggest starting with low heat—usually around two to three minutes, then letting the whole container cool inside the microwave, giving the remnants of heat time to coax moisture out without shock. Sometimes you get the best of both worlds: full color, petals as soft as paper, little change in shape. Other times blooms crumble or scorch around the base, especially if moisture pockets near the stem explode under heat. Thicker stems or dense flowers like dahlias give mixed results compared to smaller, lighter blossoms like daisies.The truth comes from hands-on tries. Silica gel works just fine for drying blooms with their stems, so long as the stem fits in your drying container and you’re gentle packing the beads around it. Avoid smashing petals, and tap the gel carefully to tuck around the stem’s base. Use gloves or a spoon—those beads get everywhere. The upside is that the flower’s natural posture sticks around, which looks great in shadowboxes or as a single keepsake. The microwave method works best for small-batch drying and for less-dense stems. Anything with a woody stem or big, wet calyx at the base tends to dry unevenly or even roast at the bottom. Rather than cranking up the heat, try shorter intervals and check results each time. A slight bend of the stem after microwaving reveals if it’s still damp—if so, more air drying or another short microwave zap helps finish the job. Preserve color by watching for bead color-change indicators, and store the silica gel properly afterward. Safety matters: silica gel itself isn’t food safe, and should never go into the regular kitchen containers.Tools like silica gel and microwaves offer big benefits, but patience often beats reckless speed. Folks who make pressed-flower art or wedding keepsakes discovered that a blend of old and new methods keeps results looking sharp. After microwaving, some let the flowers sit in the gel for a day to finish drying without risk of heat shock. For really stubborn stems, cake-decorating floral tape helps reinforce the weak points after drying. Using a mix also prevents wilted results—start with a short microwave session, finish the rest with silica gel in a sealed container, waiting two or three days. For rare or truly precious blooms, air drying might still win on safety, since there’s no chance of random scorching.The craving to save every bouquet, every gift, sometimes runs up against life's rush and a natural wish for flawless results. To beat the rush without breaking the petals, try small batches first to test the right mix of microwave power and drying time in silica gel. For larger, woody-stemmed stems or especially moist blooms, cut the stems shorter before placing them in silica gel. Mix-and-match drying—using both silica gel and the microwave—often leads to less fading and better texture, especially in humid climates where air drying struggles. Watch for feedback from experienced crafters, online forums, even local clubs; real stories often beat step-by-step manuals. For every failed batch—yes, it happens—there’s a lesson for the next bunch on what the flowers can handle. Most importantly, treating flower drying as a bit of trial, error, and celebration of each result keeps the process from feeling like a science test.Efforts to keep ephemeral moments hold special meaning in home arts. Drying flowers—whether done slowly in a box of silica gel or sped up with creative use of the microwave—shows a kind of care that goes beyond a craft trend. Having personally watched a preserved gardenia bring back a childhood summer, or seeing a faded but beautiful wedding boutonniere framed for decades, I know that the way we choose to keep those memories has value far beyond the process itself. As with any hands-on hobby, no single method fits everyone. Silica gel, used mindfully, delivers color and shape, while the microwave, in careful doses, can bring fast, beautiful results for those ready to learn each flower’s quirks. Whether seeking to build a keepsake or create art, the drive to keep flowers vivid and close offers a timeless way to celebrate both tradition and new invention, one bloom at a time.

Can you reuse silica gel after drying flowers?

Can you reuse silica gel after drying flowers?

Drying flowers at home has grown into a rewarding hobby. People hope to keep their garden’s brightest blooms for months or even years. Silica gel plays a big part in this. Pour those blue or white granules around petals, and they quietly draw out the moisture while helping blossoms keep their shape and color. Over time, it’s easy to find spent silica gel piling up in jars and tubs, leading to an obvious question for anyone who hates waste: can you reuse silica gel after using it to dry flowers, or do those small beads have one job only?Silica gel doesn’t actually gel — it’s a hard, porous form of silicon dioxide that acts like a magnet for water. Set it next to any fresh blossom, close the container, and watch its magic. Unlike sand, silica gel traps water in countless microscopic pores. Its drying action comes down to surface area, and these little beads really bring it. Used in everything from snack food packets to shoeboxes, silica gel sits in many homes already, though most folks treat it like single-use plastic and toss it when done with drying. That habit doesn’t match with the facts. The beads’ true trick comes from what happens after they’re saturated.The good news: silica gel can last for years with some simple care. Once filled with water from your last flower batch, those beads still carry their full structure. Use an oven to drive off the moisture. Spread them on a baking sheet, heat at 250 to 275 degrees Fahrenheit for a few hours, and you’ll see their color shift back if you use the crystal types that turn blue or orange after drying out. Non-indicating silica gel will look the same but act refreshed. This method leaves the beads hungry for another load of flowers.I’ve seen complaints from crafters about reused silica gel leaving behind dust or strange odors. That experience points to contamination. Flowers often carry sap, oils, or bits of pollen. These can rub off on the drying granules, especially if petals break apart. If you notice buildup or the silica gel smells musty after drying, it’s risky to use it for delicate blooms again. Regular oven drying helps with moisture but won’t scrub away the residues from plant matter. Some people have success sifting the beads through a fine mesh or blowing off debris with gentle bursts of air. Washing silica gel with water and letting it dry leads to clumping, which breaks down its effectiveness, so sticking with dry cleaning has more upside.Throwing away silica gel after a single use feels unnecessary. The environment benefits when we take care to reuse resources that don’t break down after their original purpose. A home supply of silica gel often outpaces what you can buy in any one packet. Many crafters and gardeners pay real money for large tubs, hoping to protect both flowers and smaller treasures. Roasting beads to recharge them means less plastic waste in the trash can and makes the process of preserving memories more sustainable. Regular recharging also reduces the need to buy replacement granules, which saves money and cuts demand on raw materials.Not all silica gel comes with indicators that make the refresh process simple. Without those color-changing beads, it’s easy to guess wrong on how dry your silica gel is. This can lead to less-effective preservation or, in rare cases, ruined flowers. If you rely on the type with blue or orange indicators, you can tell with just a glance when to refresh batches. Those working with the plain kind may want to check for residual dampness before committing a new bouquet. Custom dyes and markers work for some, but nothing matches the visual ease of indicator beads. If the silica gel ever breaks down into fine powder or chunks, it won’t provide reliable drying. At that point, it’s time to replace it.Silica gel has been used for decades in everything from food packaging to museum artifact storage. Its ability to absorb about forty percent of its weight in water makes it reliable for repeated use. Museums routinely dry silica gel and evaluate its performance before trusting it with precious objects. For home flower drying, those standards work too. A single pound of silica gel can dry many batches of blooms over years if kept clean and refreshed. Most experts recommend discarding only silica gel that’s heavily contaminated or physically degraded, but regular maintenance works for the rest. Reusing silica gel comes down to a mix of careful inspection and regular recharging. Sift out the debris, heat it dry, and check for lingering odors. If beads still seem musty or sticky, consider replacing that batch for precious projects. Those drying high-value flowers, like bridal bouquets or rare species, often keep a fresh supply on hand for important work and reuse only with less vital projects. Buying indicator-type gels saves time, and storing beads in airtight containers protects against accidental moisture from the air. Share extra or spent beads with those drying less sensitive items, such as craft models or seed packets, instead of tossing them. Treating silica gel as reusable keeps flower drying cost-effective and minimizes waste. It doesn’t take much effort to extend its lifespan. Store it dry, keep it clean, and refresh it in the oven. Treat suspect batches with care or use them for purposes where maximum performance matters less. By respecting both the science and the art behind silica gel’s properties, home crafters can enjoy more beautiful dried flowers—without churning through endless supplies.

How long to leave flowers in silica gel? Can you over dry them?

How long to leave flowers in silica gel? Can you over dry them?

Preserving flowers is something many people try at least once. Maybe it’s a wedding bouquet, a birthday gift, or simply a bloom from the backyard that holds some kind of memory. Silica gel offers a way to capture those moments and keep flowers looking close to fresh. It’s an easy idea—you bury the flowers in the gel and let them “dry.” Yet, every time I’ve guided someone or tried this myself, the question pops up: How long should those petals stay hidden under the blue crystals, and is there such a thing as “too dry”?Through years of fumbling with coffee cans and plastic containers filled with silica gel, I’ve learned that every flower is different. Silk-thin petals like those on daisies or cosmos drop their moisture faster and call for a gentle touch, usually five to seven days. Thicker blooms—roses, gardenias, peonies—ask for at least a week, and sometimes up to two. If you try to rush, expecting the process to finish overnight, petals can wilt or darken. Letting them sit for too long, a fear that doesn’t always cross people’s minds, often causes the petals and stems to become brittle and lose their life. Over-drying can sneak up on you—after a certain point, the colors dull and petals that once felt papery now break and crumble if handled. Nobody wants a preserved rose that shatters at a whisper.Flower preservation isn’t just a craft. It connects to basic plant biology. Fresh flowers hold a lot of water. Pulling that moisture away too quickly with a heavy layer of silica gel can cause shrinkage or misshapen buds. Too little gel or too open a container can trap humidity and start mold. If the flowers stay buried much longer than their ideal window, the remaining structure—the stem, the petal veins—gets so dry that it gives up all flexibility. Veterans sometimes recommend checking after three to four days, especially with fragile blooms, and gently brushing away some gel to peek at the petals. If the flower still feels “plump” and chilly to the touch, it needs more time. If crispness has set in and the color looks true, it’s best to lift it out.No two households match in terms of indoor humidity, daily temperatures, or even the type of silica gel in use. All these details shift how quickly flowers dry. If you work with silica gel often, it’s smart to keep a notepad handy and jot down the date you set a batch aside and when you check them. Over-drying isn’t just a minor mistake; it means hours or days of patient waiting get wasted, as petals and leaves can disintegrate during display or crafting. The best approach is to check regularly, learn from every attempt, and accept the humble fact that even the guidebooks only share averages instead of universal rules.People turn to flower preservation for many reasons. Sometimes, it’s about holding onto beauty. Sometimes, it’s about saving a piece of a story. Drying with silica gel isn’t just about following a recipe. I’ve shared afternoons with others, sorting flowers and laughing about the ones that turned to confetti because we left them buried too long. The experience matters—slowing down, checking progress, learning by touch and sight. Online communities and florists share wisdom, offering tips like mixing thick and thin-petaled blooms separately. Keeping a close eye on things, tracking time, and having the patience to resist the urge to “just let it go another day” make all the difference.The truth is, every batch teaches something new. A flower that shatters from over-drying can still look perfect in a flat pressed frame, as long as you cultivate a gentle hand. If you consistently struggle with brittle blooms, experiment with a shorter drying cycle. Use a spoon or brush to gently free a test flower, checking not just for dryness, but for flexibility and color. A humidity gauge in the drying space helps, too. For people who want reliability, setting a reminder to check after day five or six, then every day after, can save a beloved flower from turning to dust. Save any odd pieces for smaller crafts—resin jewelry, bookmarks, or bath sachets—so no effort goes to waste.Nothing beats old-fashioned trial and error. Even after years of drying, I still run into a flower that throws me a curveball—a carnation that holds on to more water than you’d expect, or a tiny forget-me-not that dries out before you blink. Sharing results, tips, and even mistakes in forums or local garden clubs adds something meaningful to the process. The result isn’t always perfect, but the practice builds trust in your eyes and your hands. Choosing patience, recording each try, and staying open to learning from every flower brings more lasting success than any strict guide. In the end, honoring that memory or beauty becomes easier with each season.